")

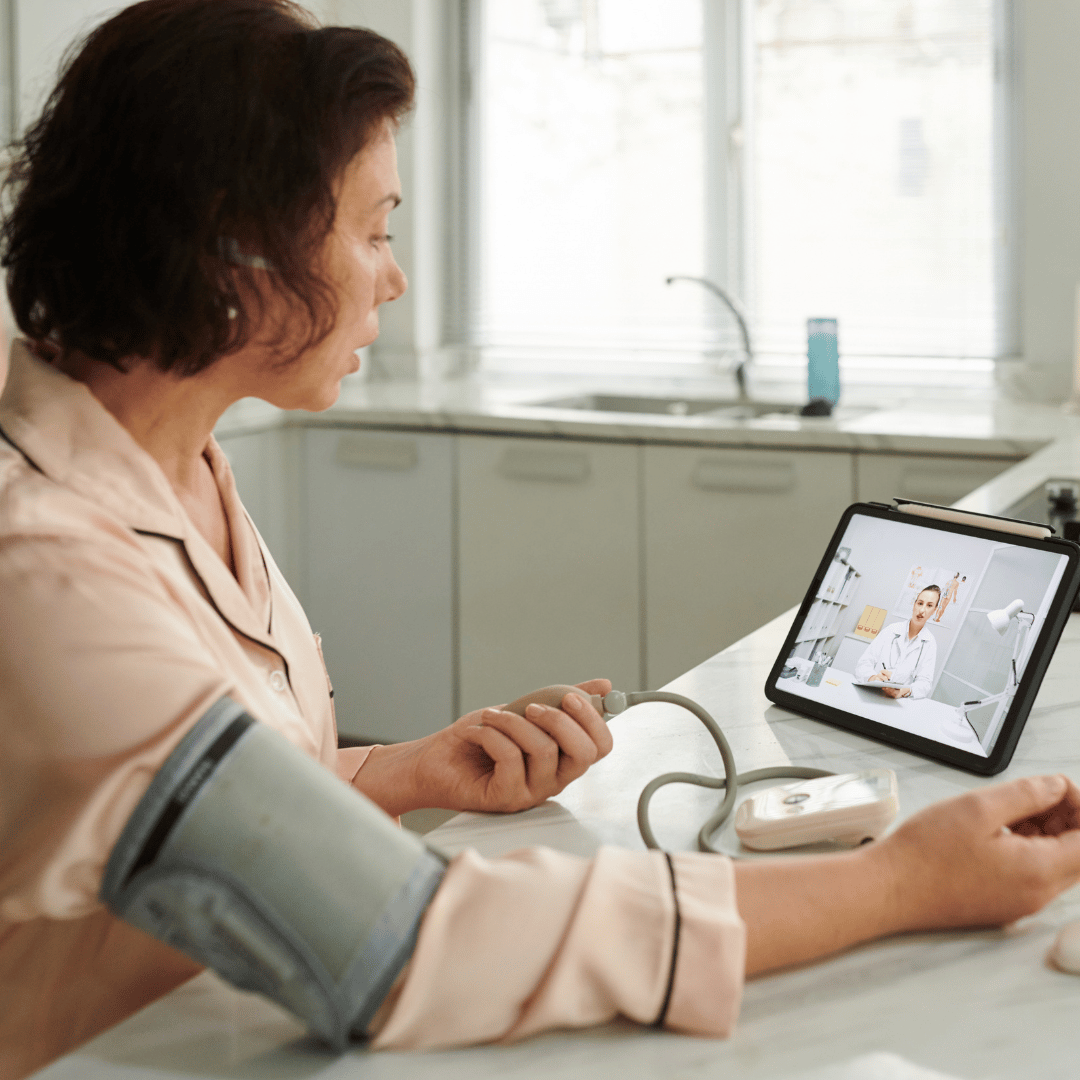
Monitoring blood pressure at home can be one of the most empowering steps you take for your heart health. While many people have a general idea of how to measure blood pressure at home, accurate monitoring is often overlooked and can make a big difference in trusting your numbers.
In addition, the readings can feel confusing or stressful, leaving you unsure what to do next.
Learning how to measure blood pressure at home can make all the difference. Using the right equipment, timing it properly, positioning, and understanding which arm to use helps ensure your blood pressure measurements are accurate and useful for you and your healthcare team.
This blog walks you through five simple, evidence-based steps to help you feel confident and informed when taking your at-home blood pressure readings.
Why Measuring Blood Pressure At Home Is Important
Research shows that home blood pressure monitoring (HBPM) is a reliable, convenient, and cost-effective way to monitor and manage blood pressure over time.
A single blood pressure reading in a doctor’s office doesn’t always reflect your usual blood pressure. Stress or anxiety during a clinic visit can temporarily raise readings, which is why home blood pressure monitoring is recommended to help distinguish white coat hypertension from true hypertension.
This matters because high blood pressure is often called a “silent” condition. You can feel totally fine and still have elevated numbers. Over time, untreated high blood pressure can increase the risk of serious health problems like stroke, kidney disease, plaque formation, and heart disease.
For people with or at risk of high blood pressure, it’s strongly recommended that they take at home blood pressure measurements alongside clinic readings.
Here are a few of the benefits of learning how to measure blood pressure at home:
- Potential to be more accurate than a single in-office blood pressure reading: Readings are taken in a familiar, less stressful environment, so they can be more accurate when done correctly.
- Early detection: Measuring at home can help you see blood pressure trends that may be missed during occasional clinic visits.
- Greater confidence and earlier action: Regularly seeing your own blood pressure readings helps you recognize patterns sooner and take action earlier, which can support better long-term blood pressure control and reduce the risk of silent, progressive damage that can occur when high blood pressure goes unnoticed between clinic visits.
- Long-term prevention: Seeing patterns over time makes it easier to intervene early and reduce the long-term risks associated with high blood pressure.
When at home blood pressure measuring is done with a validated device and consistent routine, it gives your healthcare professionals and care team a clearer picture of your blood pressure.
And the encouraging part is that blood pressure often responds very well to lifestyle changes, including nutrition. Tracking at home allows you to see the improvement in real time, which can ultimately lead to reducing blood pressure medications.
As a cardiovascular dietitian, I help my clients do this all the time. Here’s a story sharing 5 things my client did to lower his blood pressure by 38 points in 3 months and reduce his blood pressure medications from three to one.

Instead of relying on a single reading, repeated home blood pressure measurements can help guide next steps, support early detection, and make hypertension management feel more doable.
How to Measure Blood Pressure At Home: 5 Steps
Now, let’s get into exactly how to measure blood pressure at home, so you can feel confident that you’re doing it accurately.
Here’s a quick look at the 5 steps to measure blood pressure at home:
- Step 1. Your device
- Step 2: Your cuff size
- Step 3: Positioning and placement
- Step 4: Which arm: right or left?
- Step 5: When and how often to check blood pressure
Taking the time to follow these steps can help you feel more confident that your blood pressure readings truly reflect what’s going on with your health.
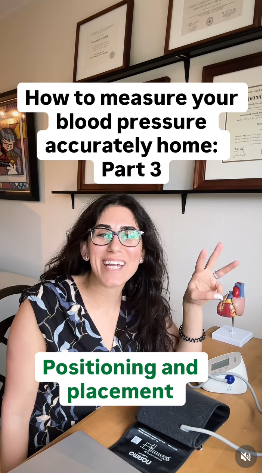
Rather watch a video? Start with part 1 of my how to measure blood pressure at home series on Instagram!
Step 1: Your Device for Measuring Blood Pressure At Home
Let’s start by making sure your blood pressure monitor is validated. This helps make sure the numbers you’re seeing at home closely match what your provider would measure in the office.
There is a trusted website called ValidateBP.org that lists home blood pressure monitors that have been independently validated according to established clinical protocols.
Validation means the device has been tested against standardized reference measurements (using trained observers and calibrated equipment) to confirm that it provides accurate blood pressure readings when used correctly.
On the website, the majority of the cuffs listed are upper-arm monitors, since wrist cuffs are more prone to inaccurate measurements due to wrist position, movement, and their distance from heart level.
One other thing to keep in mind is that even if it’s clinically validated, it needs to be calibrated every 1-2 years.
To confirm that your blood pressure monitor is providing accurate readings, bring it to a clinic visit and compare its measurements with those taken using the device in the office. This comparison helps identify if your home device starts to shift over time, and ensures that it’s still aligned with clinical standards.
If there are differences in readings, you can recalibrate your device at the clinic.
The accuracy of your readings can also be impacted by the condition of your device, such as a damaged cuff or low batteries. Accurate blood pressure measurement depends on proper cuff inflation and pressure sensing, so even small device or cuff issues can lead to falsely high or low readings, which may affect healthcare decisions over time.
A quick recap:
- Choose a validated device from validatebp.org.
- Calibrate it every 1-2 years.
- Check the batteries (if your device has them) and cuff condition.
Next, we’ll talk about how to choose the right cuff size.
Step 2: Your Cuff Size
The next step is choosing the right arm cuff size for your blood pressure monitor.
Blood pressure cuffs are designed to evenly distribute pressure around the upper arm to temporarily compress the artery and measure blood flow.
If the cuff is too small, pressure is concentrated over a smaller area, causing the device to inflate more than necessary and produce falsely high readings.
If the cuff is too large, pressure may not be applied evenly or effectively to the artery, which can result in readings that are falsely low.
Most monitors come with a standard medium cuff, which fits around 27-34 centimeters in circumference.
Some people do need a smaller or larger cuff size than that to prevent inaccurate readings, so the best thing you can do is measure your arm circumference (midpoint of your upper arm, about halfway between your shoulder and your elbow) with a soft measuring tape. After measuring, take a look at these numbers to see which size you need:
- Small cuff: 22-26 cm
- Medium cuff: 27-34 cm
- Large cuff: 35-44 cm
- Extra large: >44 cm
If you need something other than a standard medium cuff, you can order it through the manufacturer or authorized suppliers. Studies have shown that about 40%-55% of adults need a large or extra-large cuff, so make sure you’re checking and ordering the correct size.
Using the wrong size cuff can lead to falsely high or low readings, which is why taking a minute to measure your arm and choose the correct cuff size can make a meaningful difference in how reliable your blood pressure numbers are.
Step 3: Positioning and Placement
The next step is understanding proper positioning and placement when learning how to measure blood pressure at home for an accurate blood pressure reading.
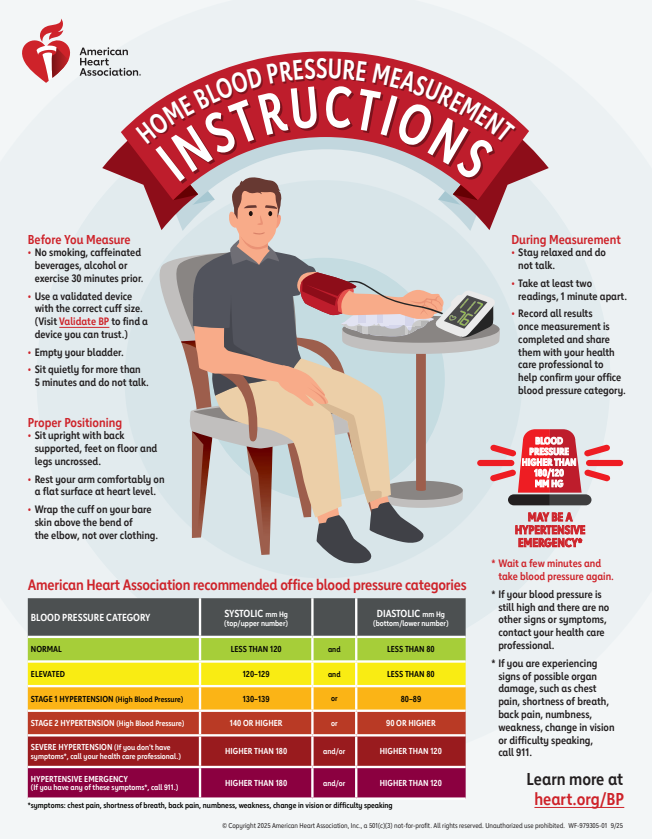
- Support your back: Sit in a chair with a backrest so your back is fully supported, which helps prevent falsely elevated readings.
- Keep your feet flat: Place both feet flat on the floor and avoid crossing your legs. Crossing your legs has been shown to significantly raise blood pressure readings, due to changes in blood flow and muscle tension during measurement.
- Apply the cuff correctly: Put the cuff on your upper arm so it’s snug but not too tight, positioning it about one inch above your elbow.
- Align the cuff: Make sure the center of the cuff is positioned straight down the middle of your arm for accurate results.
- Position your arm at heart level: Rest your arm on a table so it’s supported and level with your heart during the measurement. When your arm is unsupported or held up, the shoulder and arm muscles have to contract to hold it in place, which can temporarily raise blood pressure.
- Stay still and quiet: Press the start button and avoid talking or moving while the cuff inflates and deflates.
- Record your reading: Once the cuff releases and the measurement is complete, review your numbers and log your blood pressure reading.
Here’s a quick demonstration of me taking a reading on myself so you can see how to sit and position the cuff.
Step 4: Which Arm: Right or Left?
The first step in deciding which arm to use for measuring blood pressure is to actually measure both.
Look at the readings and see if there’s a difference in the numbers. If there’s a slight difference in readings, don’t worry, just always check the arm that is slightly higher moving forward.
However, if there’s a difference of 10-15 or more points from one arm to the next, it could indicate potential vascular disease.
If you do have a big difference, you’ll want to go back to your doctor for further evaluation. They should be doing an ankle-brachial index to rule out peripheral artery disease, and may need further testing to rule out any further circulatory problems.
Step 5: When and How Often to Check Blood Pressure
The final step in how to measure blood pressure at home is understanding when and how often to check.
The guidelines recommend checking twice a day, but if that doesn’t feel attainable for you, start with one time a day.
If you’re measuring your blood pressure once a day, start with a morning reading. Blood pressure tends to be more stable first thing in the day, before medications, food, caffeine, or daily stressors can influence your numbers. Taking your reading after using the restroom also helps prevent temporary elevations caused by a full bladder.
The final step is to consistently track your blood pressure readings so they can be used to guide care, including nutrition strategies with a registered dietitian who specializes in heart health. For many people, evidence-based nutrition is a first-line approach for improving blood pressure.
As a cardiovascular dietitian, I always have my clients track their blood pressure so we can provide targeted strategies to improve their values using science based nutrition. Then, your care team can use your blood pressure log to make more informed treatment decisions, including adjusting medications and, in some cases, safely reducing the need for medication as blood pressure improves. In my 14+ years in cardiology nutrition, blood pressure medications have proven to be the easiest ones to remove.
Ready to take control of your blood pressure? Get started by booking a free discovery call to gain clarity, confidence, and understand how a personalized plan can help you lower your blood pressure.
How to Measure Blood Pressure At Home: Summary
Below is a quick recap of the key steps to help you measure blood pressure at home accurately and with confidence.
- Use a validated device to ensure your blood pressure readings are accurate and comparable to those taken in a medical setting.
- Choose the correct cuff size based on your arm measurement, since the wrong cuff can skew your results.
- Focus on proper positioning and placement, including supporting your back, keeping your feet flat, and resting your arm at heart level.
- Check both arms initially, then continue measuring on the arm with the higher reading.
- Measure at consistent times, ideally in the morning and evening, and track your readings over time.
How to Track and Use Your Readings
Blood pressure readings are most useful when they’re tracked over time, not viewed as one-off measurements.
Write down each measurement, along with the date and time of day.
I like to encourage my patients to keep track of their readings so we can use targeted nutrition strategies to improve numbers. They can start to notice patterns, and if their blood pressure begins to trend lower, they can bring their readings to their doctor to potentially decrease or stop their medication.
To make this easier, I’ve created a downloadable blood pressure tracking PDF you can print or keep digitally to help you stay consistent and organized. When you download it, you’ll also be added to my email list, where I share practical heart-health tips, resources, and updates with you.
When to Contact a Healthcare Provider
Managing blood pressure often involves different types of support at different times. Some situations require immediate medical care, others call for follow up with your doctor, and many benefit from personalized nutrition counseling.
Understanding who to contact and when can help you take action and get the right level of care at the right time.
Seek immediate medical attention if you have:
- Blood pressure readings at or above 180/120 mm Hg, especially if they remain high after repeating the measurement
- Symptoms such as chest pain, shortness of breath, severe headache, dizziness, vision changes, or feeling faint
These situations may signal an urgent or emergency issue and should be addressed right away.
Contact your doctor if you notice:
- Consistently elevated readings above 130/80 mm Hg
- Sudden or unexplained changes in blood pressure
- Blood pressure readings that are too low, particularly if you’re taking medication
- Questions about whether medications or doses are still appropriate
Your medical provider can evaluate risk, rule out underlying causes, and determine whether medication or further testing is needed.
Seek additional, ongoing support from a cardiovascular dietitian to help lower blood pressure through nutrition and lifestyle changes and, in some cases, work toward reducing medications with your care team.
When a cardiovascular dietitian is part of your care team, the focus shifts from simply monitoring blood pressure to actively lowering your numbers through personalized, science-based nutrition and lifestyle strategies.
When done correctly, home blood pressure monitoring becomes a powerful tool for lowering blood pressure, protecting your blood vessels, driving change, and reducing long-term cardiovascular risk.
If you’re ready to improve your blood pressure through evidence-based nutrition and lifestyle changes, here are three ways to get started.
- Download my free blog pressure log.
- Book a free discovery call to get started with 1:1 nutrition counseling
- Join my Optimize group program, where I have an entire week dedicated to nutrition strategies to optimize and address endothelial dysfunction.
P.S. You can find a 5-part Instagram series covering these steps in more detail on my Instagram page. Follow my Instagram account for continued education and updates.
References
- Kario K. (2021). Home Blood Pressure Monitoring: Current Status and New Developments. American journal of hypertension, 34(8), 783–794. https://doi.org/10.1093/ajh/hpab017
- George, J., & MacDonald, T. (2015). Home Blood Pressure Monitoring. European cardiology, 10(2), 95–101. https://doi.org/10.15420/ecr.2015.10.2.95
- American Heart Association. (n.d.). Home blood pressure monitoring. Retrieved January 15, 2026, from https://www.heart.org/en/health-topics/high-blood-pressure/understanding-blood-pressure-readings/monitoring-your-blood-pressure-at-home
- American Medical Association. (n.d.). Validated device listing. https://www.validatebp.org
- Jackson, S. L., Gillespie, C., Shimbo, D., Rakotz, M., & Wall, H. K. (2022). Blood Pressure Cuff Sizes for Adults in the United States: National Health and Nutrition Examination Survey, 2015-2020. American journal of hypertension, 35(11), 923–928. https://doi.org/10.1093/ajh/hpac104
- Clark, C. E., Warren, F. C., Boddy, K., McDonagh, S. T. J., Moore, S. F., Teresa Alzamora, M., Ramos Blanes, R., Chuang, S. Y., Criqui, M. H., Dahl, M., Engström, G., Erbel, R., Espeland, M., Ferrucci, L., Guerchet, M., Hattersley, A., Lahoz, C., McClelland, R. L., McDermott, M. M., Price, J., … Campbell, J. L. (2022). Higher Arm Versus Lower Arm Systolic Blood Pressure and Cardiovascular Outcomes: a Meta-Analysis of Individual Participant Data From the INTERPRESS-IPD Collaboration. Hypertension (Dallas, Tex. : 1979), 79(10), 2328–2335. https://doi.org/10.1161/HYPERTENSIONAHA.121.18921
- American Heart Association. (n.d.). When to call 911 about high blood pressure. https://www.heart.org/en/health-topics/high-blood-pressure/understanding-blood-pressure-readings/when-to-call-911
- American Heart Association. (n.d.). Home blood pressure measurement instructions [PDF]. https://www.heart.org/-/media/files/health-topics/high-blood-pressure/how_to_measure_your_blood_pressure_letter_size.pdf
- Nuredini, G., Saunders, A., Rajkumar, C., & Okorie, M. (2020). Current status of white coat hypertension: where are we?. Therapeutic advances in cardiovascular disease, 14, 1753944720931637. https://doi.org/10.1177/1753944720931637
- Pinar, R., Sabuncu, N., & Oksay, A. (2004). Effects of crossed leg on blood pressure. Blood pressure, 13(4), 252–254. https://doi.org/10.1080/08037050410000903